
Web Meeting (Zoom) Setup Method
It is possible to acquire links for all classes simply by making a single on-screen reservation for all classes with Canvas LMS. Due to the fact that they are hybrid classes, classes that have been recorded can be made available to students simply by setting the recordings that are to be released to [ON].
Zoom Setup Method
-
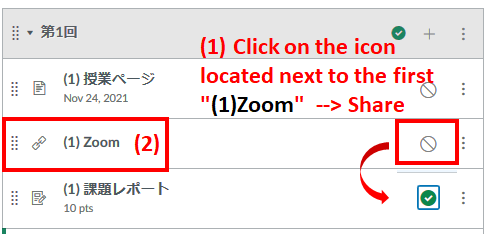
For example, (1) click on the icon located next to [(1) Zoom] for the first meeting, to set the parameters for making meetings public (the mark will turn green, and the contents will be able to be viewed by the attending students).
Then click on the (2) Zoom title.
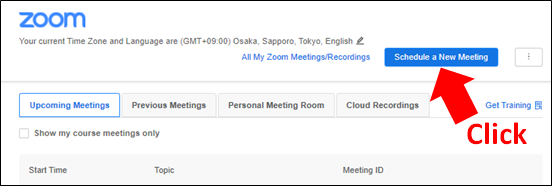
- The Zoom screen will be displayed. Click on [Schedule a New Meeting].
-
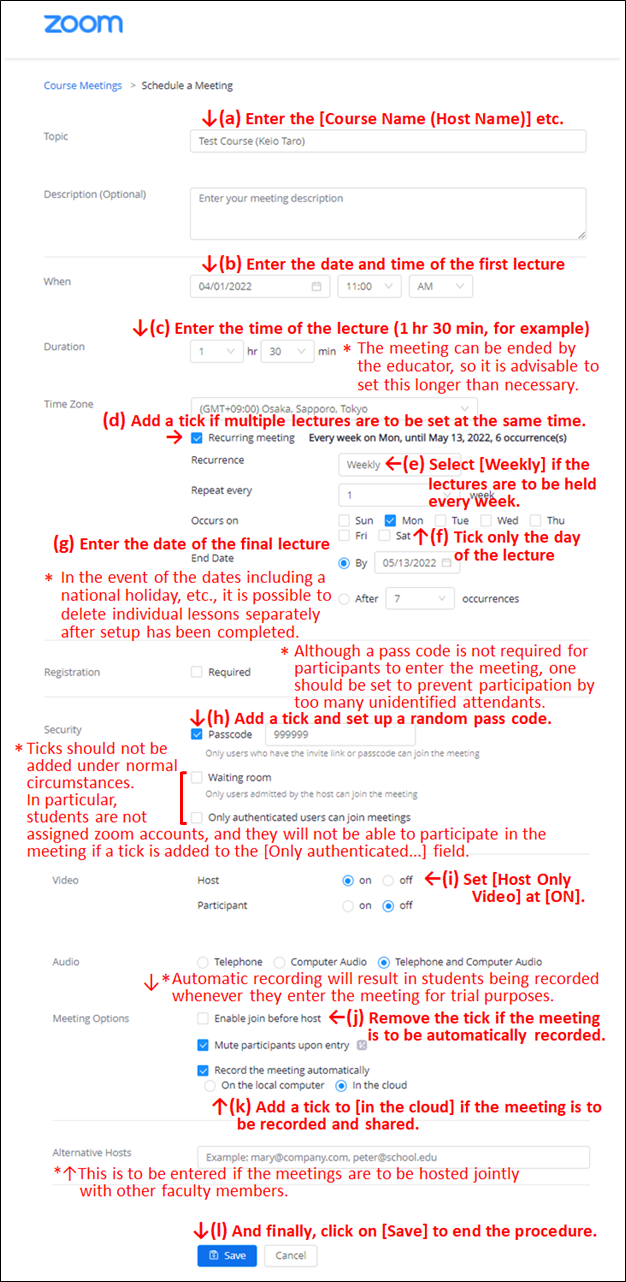
Carry out the operations from (1) to (12) and set up the Zoom meetings for all of the lectures you will host.
- Click on [Zoom] located on the menu on the left.
-
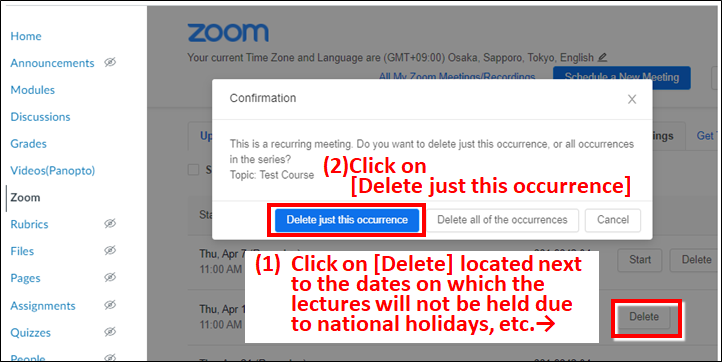
Delete the meetings that have been set to be held on national holidays, etc., if no lectures are scheduled.
Making Recorded Meetings Public
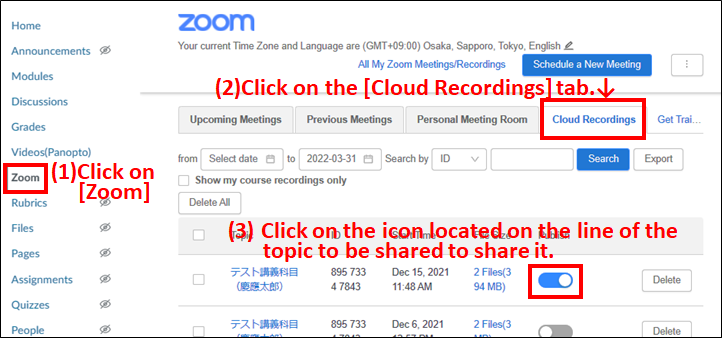
(1)Click on [Zoom] to display the Zoom screen.
(2)Click on the [Cloud Recordings] tab to display a list of the topics recorded on the cloud.
(3)Click on the buttons located in the column of topics that are to be made public so that they are made available to attending students.
Details on the method for attending students (students) to view the cloud recordings are available here
Meetings: Cloud Recording Data
The period for storing data saved with the cloud recording function is 120 days (+ 30 days in the trash can).
If recordings of meetings are to be made public for attending students after 120 days, consider making them available on Video Portal instead of Zoom.
Meetings: Cloud Recording Data
Log in to Keio Tenant's Zoom (https://keio-univ.zoom.us/signin).
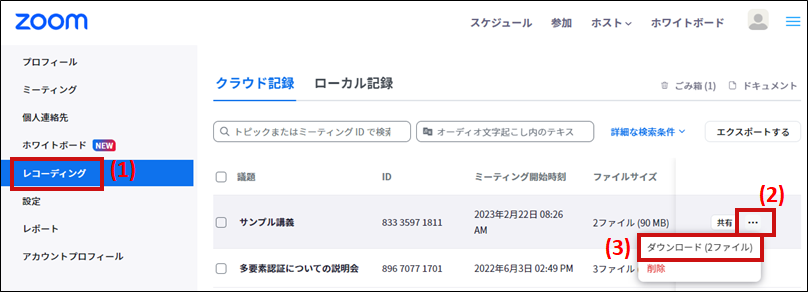
Click (1)[Recording] on the left menu, click (2) in the column of the name of the lecture you want to download, and click (3)[Download (2 files)].
Making Meetings Public on Video Portal
Please refer to the following sections of Video Portal Operating Instructions Manual
- Upload and manage videos(動画のアップロードと管理)
- Use uploaded videos(アップロードした動画を使用する)
※If you want to keep track of students' viewing history, you need to embed it in an assignment or module.
Checking the Statistics for Videos Made Public on Video Portal
For videos uploaded to the Video Portal, viewing history can be viewed on the “Student's Viewing History” tab of the Video Portal.
※If you want to keep track of students' viewing history, you need to embed it in an assignment or module.
※However, if this is viewed on a terminal for which Adblocker or other advertisement blocking tools are activated, there are cases in which the data will not be reflected correctly on the viewing statistics.
Feel free to use this function within the limitations of reference information.
For detaild, please refer to the following sections of Video Portal Operating Instructions Manual
- Check video viewing history(動画の視聴履歴を確認する)
Last-Modified: October 27, 2025
The content ends at this position.